We have embarked on another wonderful journey of bringing our clients visions to life and a learning experience for us.
After a few months picking through pictures of walnut slabs, several emails with our clients regarding design and emailing pictures of several slabs, they chose this beautiful walnut slab from Good Hope Hardwoods out of Pennsylvania.
After talking to Skip at Good Hope Hardwoods and verifying that it is dry, not warped and ready to ship, this slab was purchased and shipped to us freight.
It arrived today and was delivered to Nets Cafe of Maybell Colorado. It is the only cafe in town with wonderful food, great conversation and an overall wonderful place to quench your thirst. We have our freight items picked up and delivered at the Cafe because is a lot easier to get the freight trucks in the parking lot than it is to get them up our driveway. So a HUGE THANK YOU to George and Jeanette Bosick of Nets Cafe for letting us your parking lot for pick ups and drop offs. If you are ever close to Maybell Colorado, stop by Nets Cafe for wonderful down home cooking.
Here the slab is before leaving Pennsylvania

Loaded on our trailer and ready to head to the shop


Here the kids and I are with George at Nets Cafe

Well we made to our house

Getting to the shop

It is just Tim and I that work in the shop and wrestle around these heavy pieces of wood. The kids had to help today to get this one off the trailer.


The slab is covered in a piece of carpet and cardboard, this will insure that there isn't any damage done to it from playing kids and dogs, we then weighted down the corners so that it wont warp while it is acclimating to our climate and until we start working on it.
We are now waiting for the architectural drawing of the side table and frame from our client, then we will order the remaining walnut and other items that we will need to complete this masterpiece.
This is where the headboard and frame are going to set when it is completed

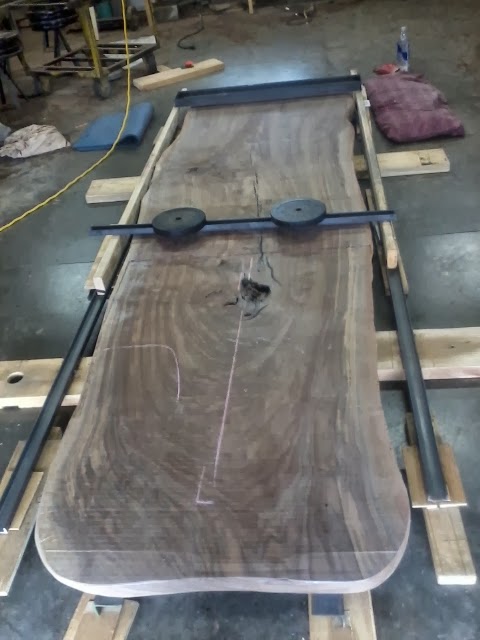
As you can see in the picture below, there are 3 boxes drawn. The two small boxes on the ends are where the built in side tables will go the middle square is where the mattress will set....

The chalk drawings on the edge are a basic idea of how the headboard will be shaped.


Trimming off a bit of excess.

Shaping and polishing the corners and edges, this walnut has beautiful grain


Now that we have come this far, it is time to get the headboard back up on the benches, set up a home made jig for our router and start leveling the wood. With any wood, it will move and twist a bit, it will stop moving at some point....
There is just Tim and I that lift and move this heavy piece of wood around.


Jig is set up and ready....

The headboard is so wide that Tim stood on one side and I other the other passing the router back and forth.... it took about 3 days to get the back side flat...

Almost halfway

The back side is complete, we set it on the floor so that it will not warp, the next day we attached 3" x 2" x 12' angle iron across the back so that it will hold is shape and stay flat. The weather has been changing from rain, snow, cold, and warm, we wanted to make sure the wood would stop moving
 | |||||
Here we are set up on the floor.... lessons learned.... when we had this on the benches, the middle of the wood was starting to sag because of the weight.... so we had place the wood on the floor, shim it up so that it sat level and sturdy, re adjust our jig to use on the floor and then level the front side of the head boar.

It took about 6 hours on our hands and knees passing the router back and forth... we finally got it level.

Our next step is to get an exact plan on the floating bed frame design so that we can build the metal frame that will hold up the headboard.... since it is going against a rock wall, it will not be attached to the wall, it will have to stand on its own......
This is the largest project that we have worked on and we definitely don't have right tools for the job, but we can improvise and make it work. There has been a lot of thinking and figuring and then rethinking and re-figuring to make this all work. There is never something that can't be done and there is never a problem.... its taking the time to find the solution......
March 24, 2014 - update
Well it has been a wild and crazy road working on this walnut bed. It took a few weeks to find more claro walnut for the bed frame and the side tables/drawers. Once the walnut was ordered and delivered we set it in our living room so that it was heated and could acclimate to our temperatures.


After about a month we hauled the slabs to a Steamboat Woodworks, they are cabinet makers and the ones that are building the side drawers that will mount to the headboard. While they were milling the slabs for the mattress frame and building the side drawers, we worked on the steel frame for the headboard to mount to. Two of the main reasons for this frame, it has to stand on its own because it won't be mounted to a wall, and the slab as warped, so we must pull it back into place and hold it there.


The side drawers are completed, we will need to polish and oil them before they are bolted to the headboard. The drawers are also made from Claro walnut, they are 20" x 20" x 9"


 |
| Claro walnut |


 |
| Electrical boxes installed for sconces |
 | |||
| cut out for light switch |
The frame will be in two pieces, the bottom will bolt to the back so that it can be moved and set up.


 |
| Levelers/supports are added |


 |
| The slab has warped so we cut 5 1/4" deep relieve cuts down the back so that we can pull it back flat and allow for natural movement of wood |


 |
| Applying oil to the back before the frame is bolted on |


 |
| Frame is bolted |